How to Install and Configure a Beacon 3D Probe on a Klipper 3D Printer in Kuwait

Written By
marketing
How to Install and Configure a Beacon 3D Probe on a Klipper 3D Printer
As 3D printing technology continues to evolve, enthusiasts and professionals alike are constantly looking for ways to improve print quality, reliability, and efficiency. One of the most effective upgrades for Klipper-powered 3D printers is the Beacon 3D probe, a high-precision bed scanning solution designed to deliver exceptional first-layer accuracy and faster calibration.
Unlike traditional bed leveling methods, Beacon 3D uses advanced sensing technology to create highly accurate bed meshes, helping to reduce print failures and improve overall print consistency. Whether you're upgrading a Voron printer or another Klipper-based machine, installing a Beacon probe can significantly enhance your printing experience.
In this guide, we'll walk you through the complete process of installing, wiring, and configuring a Beacon 3D probe. By following these steps, you'll be able to take full advantage of automatic bed calibration and achieve more reliable, high-quality prints.
What is Beacon 3D?
Beacon 3D is a high-precision bed probing and scanning system designed specifically for Klipper-based 3D printers. Unlike traditional bed leveling sensors, Beacon uses advanced contactless sensing technology to rapidly scan the print bed and generate highly accurate mesh data.
This precise bed mapping allows the printer to automatically compensate for even the smallest surface variations, resulting in improved first-layer adhesion, enhanced dimensional accuracy, and more consistent print quality. Beacon 3D also offers significantly faster probing speeds compared to many conventional sensors, reducing setup time before each print.
Popular among Voron builders and advanced 3D printing enthusiasts, Beacon 3D is an excellent upgrade for anyone seeking greater reliability, faster calibration, and professional-level printing performance from their Klipper-powered machine.
Purchasing Item

As 3D printing continues to grow in popularity, more accessories are becoming available, especially for DIY 3D printers. However, choosing the right accessories often comes at a cost.

Wiring
Wiring and connecting the purchased item may require some technical knowledge to avoid damaging the component. Be sure to follow the instructions carefully and double-check all connections before powering on the device.

Coding
Programming a new component may require some patience and a slight learning curve. However, when using a high-quality product, the process is often straightforward and typically involves following the provided instructions rather than performing complex programming tasks.
Beacon 3D Assembly
In this guide, we will walk you through the step-by-step process of installing the Beacon 3D probe on your 3D printer.
) (2)")
Adaptor
First, you need to 3D print the adaptor for your 3D printer.
Here are a couple of links to STL models for different 3D printers.
There are many STL files available, and we will be using the one for the Voron Stealthburner.
STL Files
Wiring
All you need to do is connect the USB cable to your Raspberry Pi or BTT Pi, then connect the other end to the Beacon

Coding
-
You will need to use a software application called PuTTY.
-
Open PuTTY and enter the IP address or hostname assigned to your 3D printer. Check Image 1.1.
-
A terminal window will open. Enter the username and password assigned to your Raspberry Pi or BTT Pi. If you have not changed the default credentials, use biqu as both the username and password. Check Image 1.2.
-
Follow the commands provided in the Beacon 3D documentation.
-
When you reach Step 5 in the Beacon documentation, you may wonder where to find the Beacon serial ID. Simply enter the following command in PuTTY:
ls /dev/serial/by-id/
-
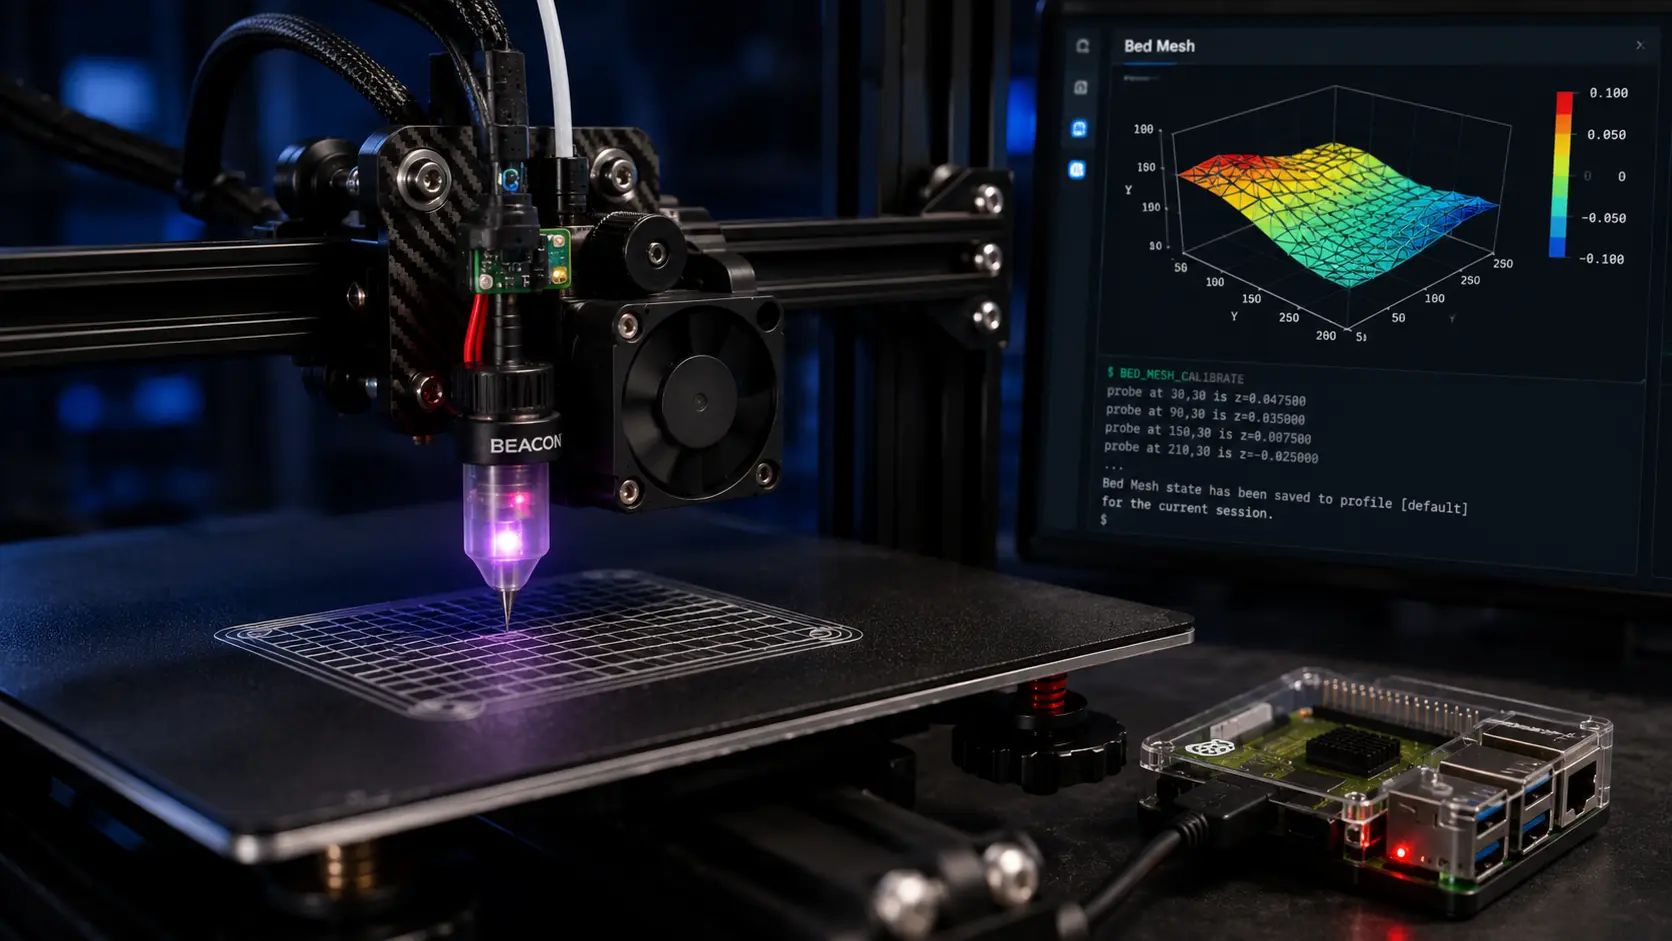
Add the following bed mesh configuration:
[bed_mesh]
speed: 500
horizontal_move_z: 4
mesh_min: 30,30
mesh_max: 250,250
probe_count: 20,20
algorithm: bicubic
If you have a 350 mm Voron printer, set mesh_max to 300,300.
-
Finally, update the start G-code in your slicer. For Voron printers, use the following code to perform a bed mesh calibration before each print:
M190 S[bed_temperature_initial_layer_single]
M109 S[nozzle_temperature_initial_layer]
PRINT_START EXTRUDER=[nozzle_temperature_initial_layer] BED=[bed_temperature_initial_layer_single]
You can use the following code instead if your PRINT_START macro supports chamber temperature and print area bed meshing:
BED_MESH_CLEAR
BED_MESH_CALIBRATE

; PRINT_START EXTRUDER=[nozzle_temperature_initial_layer]
; BED=[bed_temperature_initial_layer_single]
; Chamber=[chamber_temperature]
; PRINT_MIN={first_layer_print_min[0]},{first_layer_print_min[1]}
; PRINT_MAX={first_layer_print_max[0]},{first_layer_print_max[1]}


Conclusion
In summary, 3D printing continues to grow in popularity, bringing with it a wide range of accessories and upgrades. To ensure a smooth and successful printing experience, it is important to invest in high-quality components and carefully follow the installation, wiring, and configuration procedures.
If you need any additional assistance, feel free to contact us. If you are located in Kuwait, you are welcome to visit our workshop. Our team will be happy to help you choose and install the best upgrades for your machine, whether it is a 3D printer, CNC machine, or laser system. We are committed to helping you achieve accurate, reliable results through proper setup and maintenance.
#HappyPrinting
Tags
Related Articles

Categories
3D Printing Kuwait
(1)
3D Printer Guides
(1)
Creality Ender 3 Upgrades & Modifications
(1)
3D Printer Upgrades & Calibration
(1)
3D Printing Guides & Tutorials
(1)
Programming 3D Printers
(1)
3D Printer Troubleshooting
(1)
Recent Posts
3D Printer Troubleshooting
2026-06-24Programming 3D Printers
2026-06-243D Printer Guides
2026-06-24

Archives
Jun 2026
(7)
More From marketing
3D Printer Troubleshooting
2026-06-24Programming 3D Printers
2026-06-243D Printer Guides
2026-06-24